 Think to yourself for a moment — on average, how many hours do you sleep per night?
According to a report put out by the World Association of Sleep Medicine, the majority of Canadians are sleep deprived. 60% of adults feel tired most of the time, getting an average of 6.9 hours of sleep per night, with the recommended being 8 [1]. The same trend continues in the United States and most modern societies. Everyone knows that sleep is important, but the reality is that not many of us actually get what we need. We’re too busy with work, family, sports, or even just Netflix, to give our body’s the rest they need. But if you’re looking to improve your body composition and your overall health, getting enough sleep is critical. Why is sleep important? Sleep is the time when the body repairs itself. It gives us an opportunity to relax, shut down body systems into low power mode, and focus on repair and restoration. Specifically, here are 7 reasons why adequate sleep is key: 1. Improves productivity, concentration, and memory 2. Maximizes athletic performance 3. Improves immune function 4. Decreases risk of developing heart disease and stroke 5. Improves glucose metabolism and decreases risk of type 2 diabetes 6. Decreases levels of inflammation 7. Boosts mood But the one other thing that sleep is incredibly important for is maintaining a healthy weight and body composition. As sleep regulates our hormones, lack of sleep can cause imbalances, which may result in weight gain. How sleep and weight are related Poor or inadequate sleep is one of the leading risk factors in the development of obesity. Studies have shown that both children and adults with short sleep durations are significantly more likely to become obese [2, 3]. But why is this? Our bodies are largely controlled by hormones — chemical messenger secreted by endocrine glands that influence most major body functions, which includes how we use and store energy. They also mediate the interactions between sleep, metabolism, and BMI. The two main hormones that control our hunger, leptin and ghrelin, are highly influenced by sleep patterns. Leptin is a hormone that is released from fat cells that signals to the brain, the hypothalamus specifically, that you have enough energy and don’t need to eat; it functions mainly to prevent humans from starvation of overeating. The other hormone, ghrelin, is an appetite-increasing hormone that’s function is regulated primarily by food intake; it acts on the hypothalamus, as well, to stimulate hunger. A study conducted on the impact of sleep on body composition showed that levels of ghrelin were higher in individuals with short sleep, while levels of leptin were lower [4]. Short-term sleep restriction lowers levels of leptin, which in turn increases levels of ghrelin [5]. When you don’t sleep enough, cortisol levels also increase. Cortisol is the stress hormone that is frequently associated with fat gain, but it helps to activate reward centers in your brain that make you crave food, too. A combination of high ghrelin and high cortisol inhibits communication to the areas of the brain that leave you feeling satisfied after a meal [6], meaning you’re never quite feeling full and continue to crave low quality foods. Combining all of these factors, we leave ourselves at a higher risk for gaining weight and being unable to lose it. Additionally, hypothalamic-pituitary functions that control eating habits, energy balance, and metabolism are all tied to circadian rhythms, meaning they are highly integrated with sleep regulation processes. Experiments have demonstrated that lack of sleep has important effects on cortisol levels, glucose tolerance, and growth hormone secretion [7]. Therefore, when hormone balance is off, we put ourselves at higher risk for weight gain because we are tired. Putting it all together Not only does lack of sleep affect your body’s basic functions, but it also probably means your energy levels aren’t quite as they should be. When we have low energy, we are less productive and have less motivation to partake in activities, whether that be the gym or simply doing work around the house. And we all know that lack of movement and activity is a large contributor to weight gain. So while we may fall off the proper sleep train every now and again, it’s crucial to get your sleep habits under control. Limit exposure to blue light 2-3 hours before bed, ensure your room is at a slightly cooler temperature, make sure there are no lights around, and relax the mind and body — all of which prepare the body for a deep, relaxing, and restorative sleep. BY COURTNEY LANDIN POSTED: MARCH 11, 2019  I’m not into fad diets and for years I scoffed at “going gluten-free.” I never wanted to be “that” person when we went to dinner but it turns out, it’s well worth being “that” person. I’ll give you a bit of background about myself. As a luge athlete I was supposed to gain weight, yes, you read that correctly, gain weight. Most people try to lose weight and I was always trying to gain it by lifting heavy and eating a lot of food. Back in my athletic days it was still a thing to “carbo load” and eat as much pasta or carbs as possible for “energy.” It’s too bad that was a thing because it made me feel awful and when I was avoiding eating that way it came across as if I didn’t want to gain weight or that I wasn’t committed to my sport. When in fact eating that way made me feel like I just needed to sleep all the time and that I was made of sand when I was training. I tried avoiding foods that made me feel this way but it was difficult living on the road and eating at hotels most of the year.
I have a friend who has Celiac disease, which is an autoimmune disorder that results from the interaction of gluten, the storage protein of wheat and other grains, with the immune system [1]. She truly can’t even eat gluten because it destroys her intestines. Since I could eat gluten and Celiac disease was still new to many people, I never thought this could be an issue for me. Now, I realize that going gluten-free isn’t for everyone. And I should also mention that I have an autoimmune disorder called Hashimoto’s disease, which is a condition in which your immune system attacks your thyroid. It can cause you to feel extremely tired, gain weight, and affects hormone production. I’ve been trying to figure out my health for years along with trying to get rid of migraines. I don’t even like saying, typing or thinking that word because they are so horrible. But it turns out that having this condition can lead to having sensitives to gluten or other carbohydrates. Fast forward several years, well out of my athletic days, and I read a book called Brain Maker by David Perlmutter, MD to learn more about gut bacteria and the book addressed many issues I was having, which included stomach problems, occasional reflux, feeling low often, and crazy brain fog. I wasn’t reading it to learn about going gluten-free but the book convinced me enough to stop eating gluten right before a trip to Italy, the land of gluten filled dishes of pasta and pizza, and nine months later I’m still gluten-free and won’t even think about going back. Although there’s more to my story, I’ll keep it short and tell you about the benefits that you can also get from going gluten-free and being “that” person even if you don’t think gluten affects you. Why gluten has such a bad rep The term gluten refers to the entire protein component of wheat, rye, and barley — the three gluten-containing grains. Gliadin, the component of gluten that contains the majority of toxins, are resistant to degradation by the protein enzymes in the stomach, pancreas, and intestines [2]. When these undigested particles are able to permeate through the barriers of the gastrointestinal system, they react with antigen-presenting cells and cause a multitude of health problems. Even if there is minimal reaction to gluten consumption, the molecule itself is poorly absorbed in the human upper gastrointestinal tract, which is why many people choose to avoid consuming it. But if gluten doesn’t bother you, why should you give it up? Maybe to your surprise, there are actually quite a few benefits to giving up gluten. While you think consuming gluten may only affect your digestion, it actually has an effect on the nervous, muscular, lymphatic, digestive, and endocrine system [3]. So here is why you may want to consider going gluten-free: Decreases brain fog Often times, people will experience brain fog from consuming gluten (even if they don’t know that is what causes it). Symptoms include difficulty concentrating, decreased attention, inability to recall, and forgetfulness. This is because inflammation caused by gluten contributes to the breakdown of the protective barrier between the blood and the brain, which can lead to damage of brain tissue. Improves joint pain Gluten is a known perpetrator of inflammation, which is a significant factor associated with joint pain. When the body isn’t perpetually inflamed, the acute response to inflammation becomes much more efficient, meaning that joint pain and recovery time improve. Helps regulate weight Leaky gut, a condition where small micro tears in the intestinal lining cause permeability, is a well-known condition associated with high gluten intake. By removing gluten from the diet, you improve intestinal permeability, nutrient absorption, and decrease inflammation, all of which contribute to weight regulation. It also helps to normalize metabolism and hunger hormones, and thus, normalize weight [4]. Reduces bloating Due to damage of the intestinal wall, GI symptoms like gas and bloating are often a common side effect of gluten. Removing gluten from the diet can help to heal and repair the gut and intestinal lining, leading to decreased GI symptoms. Improves appearance of skin More often than not, inflammation can show up on the skin in the form of acne, eczema, and dry skin [5]. By cutting out the root cause(s) of inflammation, we can improve the appearance of our skin and get back that glow! Is it something for you? An important point to remember when going gluten free is just because you’ve given up eating gluten, it doesn’t give you any excuse to replace the ‘bad’ foods with their gluten-free counterparts. There are many options now in grocery stores but try to replace the gluten-filled foods with healthier alternatives as much as you can. For example, replace whole wheat or white pasta with veggie noodles — zucchini or squash noodles make for an excellent substitution in classic spaghetti dishes. Not only are you upping your vegetable intake, but you’re also getting a bigger nutrient bang for your buck! Plus, there are many other grains you can eat instead and they are full of better nutrients than white or wheat flour. These include amaranth buckwheat (not actually wheat!), rice (brown, white or wild), millet, quinoa, and oats. But a note about oats, be sure they are gluten-free as many are made in factories that produce other wheat produces and may contain traces of it. So while cutting out gluten may seem like the end of the world at first (believe me it’s not!), keep in mind your end goal. When you remove foods from the diet that aren’t giving with your body, not only will you look better, but you’ll also feel better, which is the most important factor. I encourage you to give it a try for one month and see how you feel! BY COURTNEY LANDIN POSTED: FEBRUARY 20, 2019  The many benefits of passive heat treatment First, what exactly is passive heat treatment? Simply put, passive heat treatment includes:
The most notable types of heat therapy used are saunas, steam rooms, and hot baths. While they may be based off of similar concepts, the functions and benefits of both are somewhat different. So first, let’s cover what they are and why they’re so great. Hot baths Hydrotherapy is something that’s been practiced for centuries. Whether hot or cold, bathing offers many significant benefits. But here, we’re going to focus on heat as a method of treating various ailments. Besides sitting in the comfort of a warm tub, hot baths are actually great for the body. Here are a few reasons why [1]:
Steam rooms Steam rooms are pretty much as they sound — a room, usually made from tiles, that produces steam to 90-100% humidity. Since heat rises, sitting at a higher level in a steam room will provide greater benefits than sitting at a lower level. Like hot baths, steam rooms offer several of the same benefits:
Saunas Now that you’ve learned about a couple other forms of passive heat treatment, we can get to one of my new favorites — saunas. Touted for their wide range of health benefits, saunas have recently become a common thing to incorporate into a daily routine. If you’ve ever been to a Scandinavian country, you’ll see that saunas are extremely popular — and for good reason! Saunas are essentially a wood lined room that emits either dry heat or wet heat. Perhaps the most well known is the Finnish sauna — a room heated with a sauna stove and filled with stones that are heated by either electricity or fire.  While being popular within northern Europe countries initially, saunas are a regular practice throughout the world. If you’re wondering why they’re so highly prized, here are some reasons:
But why heat therapy? Thermotherapy is a great option to help heal non-inflammatory body pain. This is because heat is great for inducing relaxation of muscles and dilating blood vessels through raising nitric oxide levels, a potent vasodilator, to promote greater blood circulation. Conditions that a sauna might be beneficial for include:
It’s crucial to remember that heat is not good for certain conditions and may make them worse. This includes things like severe injuries or infections and acute inflammation as in the case of an arthritis flare up. For conditions involving inflammation, it’s best to use ice. If you’re using a sauna to help release tension in muscles, it’s also imperative to know the different between muscle strains and ‘knots’. Strains indicate an actual injury to the muscle (a small tear) that a sauna will not fix, while knots are small patches of tender tissue usually caused my micro-spasms that often need pressure to be released. Heating Up Passive heat treatment is an excellent way to help relieve and treat several conditions. While hot baths are the cheapest and likely most convenient method, a sauna, whether it be infrared, Finnish, or electrically heated, offers numerous health benefits both externally and internally. So next time you visit a gym or spa that offers a sauna, be sure to strip down and hop in! BY COURTNEY LANDIN POSTED: JANUARY 29, 2019 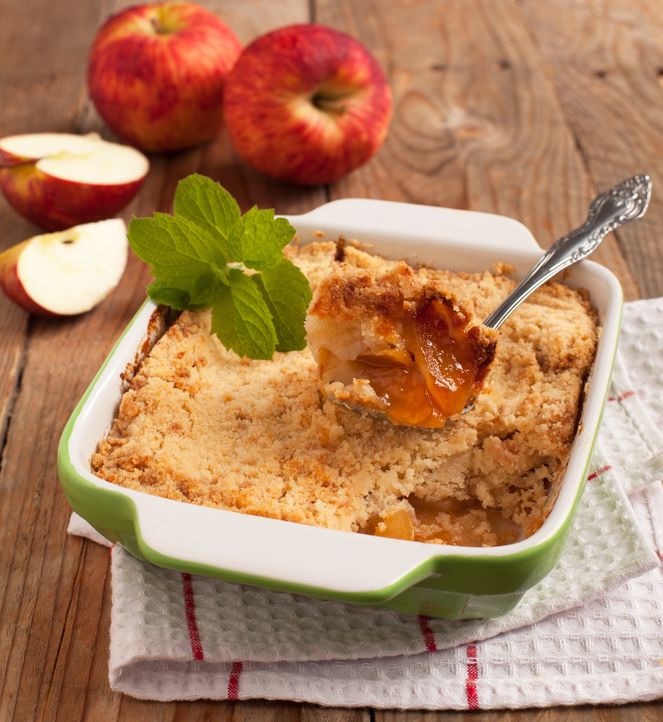 I love the fall. The nights are chilly but the days are still warm. The colours are amazing and what I love most are all the apples! So many apples to make a warm apple crisp and put a yummy cinnamon smell in the air.
I’d like to share an easy apple recipe idea that you can use in different ways. You can make it as healthy or unhealthy as you want, which is my favourite part! This is such an easy recipe and one that you don’t really need measurements for because it’s better to make it to your own taste. Here you’ll find what you’ll need along with some options on how to cook and make this apple crisp in different versions. What you’ll need for the apple mix: Apples Butter, ghee or coconut oil Cinnamon Honey or coconut sugar Nutmeg (optional) Vanilla seeds (optional) Apple Mix Directions: To make the apple mix, slice the apples (see note below) and place them in a bowl. Add a bit of butter, ghee or coconut oil to help make the mixture moist, add cinnamon, honey or coconut sugar to your liking, and any extra options such as vanilla or nutmeg. Mix and cook using the options below. See further ideas below on how to make it this in different ways! A note on apples: You can peel or leave the apples unpeeled, it’s up to your liking. Thin or small slices cook faster than larger bits, but cut to your liking. I like to mix a bit with sizes so that some bits are a little crunchy. Thin slices do best for an apple crisp with oat topping. Options for cooking: Microwave cooking: Cooking time will depend on the power of your microwave. Cook the apples for one minute and then check them. Cook them to your liking. It’s really that simple! I use a microwave that’s 800 watts and I put one sliced apple in for one minute. If you cover the apples, they will be a little more wet and leaving them uncovered will take out some of the water so, keep that in mind when cooking. Oven cooking: Set your oven to 200°c / 390°F Cooking time depends on how large a batch you are making, but check the apples around 20 – 25 minutes. Ideas for different options Healthy version: A quick “apple in a cup” treat Sometimes I want a treat that’s a tad healthy. I’ll use one apple (sometimes I peel it and sometimes I don’t), add a little butter, coconut sugar and cinnamon and quickly cook that in the microwave. Generally, half of the apple mix is enough and I’ll top it off with some cottage cheese or Greek yogurt and an extra sprinkle of cinnamon. Quick, easy and doesn’t give you a sugar crash. I’ll occasionally eat this for breakfast! This is also a great topping for oatmeal or banana pancakes. Indulgence: Apple Crisp with oat topping This makes a wonderful desert and it’s one of my favorites as t’s easy and fairly quick! Set your oven to 200°c / 400°F Prepare the apple mix to the size and taste you’d like. If you’re making a desert for a family, I’d suggest 6 apples. Put the apple mix in a baking dish. Add a small splash of water to the dish with the apples. Place the apples in the oven for 10 minutes while you make the topping. Oat crisp topping (gluten-free) 1 cup of oats (2.3 dl) 2 Tbs. Almond flour (2 matsked) 2-3 Tbs. Cinnamon (2-3 matsked) 2-3 Tbs. Softened butter, ghee or coconut oil (2-3 matsked) 3 Tbs. Coconut or brown sugar (3 matsked) A pinch of vanilla seeds or dash of vanilla extract Pinch of sea salt 6-10 Walnuts or pecans (optional) Mix the ingredients together. The oat topping should be crumbly. Spread the topping on the apples and put back in the oven until the topping is golden brown and the apples are cooked to your liking. Cooking time depends on how large a batch you are making, but check the apples and topping around 20 – 25 minutes. Let it cool down a bit but enjoy it warm. This is so good served with vanilla sauce or vanilla ice cream! BY COURTNEY LANDIN POSTED: SEPTEMBER 19, 2018  Food is fuel for your body and to have optimum energy you must give it the proper fuel it needs. Here are some simple food swaps that you can make on a regular basis to have more energy, fewer cravings, and improve your nutrition.
Good carbs: Oats Sweet potato Cous cous Root veggies (beets, parsnips, carrots) Fruit Whole grains / sourdough Quinoa Potatoes Pea pasta Veggie or bean pasta Protein: Ham/turkey/chicken Edamame Cooked lentils Eggs Tofu Hemp seeds Good Fats: Avocados Olive oil Fish (salmon) Coconut oil Nuts Good for Cooking: Light (or refined) olive oil Avocado oil Clarified butter (ghee) Coconut oil Sugar: Coconut sugar Raw Sugar Sweets: Dried dates, apricots, or prunes Almonds, cranberries or raisins, raw cocoa nibs Try these simple food swaps and tell me how it’s going. comment below or come join me on Facebook or Instagram! Now that your nutrition is up and running how about boosting that with a 12 minute workout? Check it out here. BY COURTNEY LANDIN POSTED: APRIL 26, 2017  Life gets hectic but it doesn’t’ mean that your health should take a back seat. Exercise is one of the most beneficial, natural, and easy elements that you can use to increase your health and wellness. That’s why I’ve created this 12 minute workout for you to do any time and any place that suits you. And if you want more than 12 minutes, just double (or triple) the workout! Here’s how you get started: Set your phone timer (or use an interval timer app), put on some music and begin. Warm up for 2 minutes. Ideas for warming up:
Life gets hectic but it doesn’t’ mean that your health should take a back seat. Exercise is one of the most beneficial, natural, and easy elements that you can use to increase your health and wellness. That’s why I’ve created this 12 minute workout for you to do any time and any place that suits you. And if you want more than 12 minutes, just double (or triple) the workout! Here’s how you get started: Set your phone timer (or use an interval timer app), put on some music and begin. The short list Get started: Set your phone timer (or use an interval timer app), put on some music and begin. Workout: perform each exercise for 30 seconds Bring it to the next level: perform each exercise for 45 seconds to 60 seconds.
Exercise Instructions: Warm up for 2 minutes. Ideas for warming up:
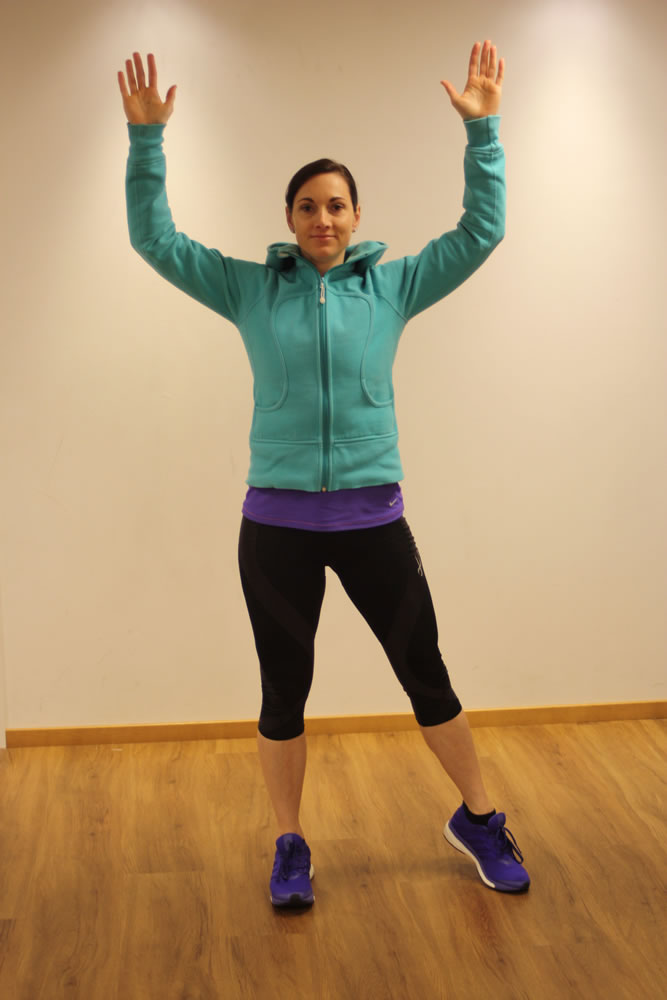 modified jumping jacks 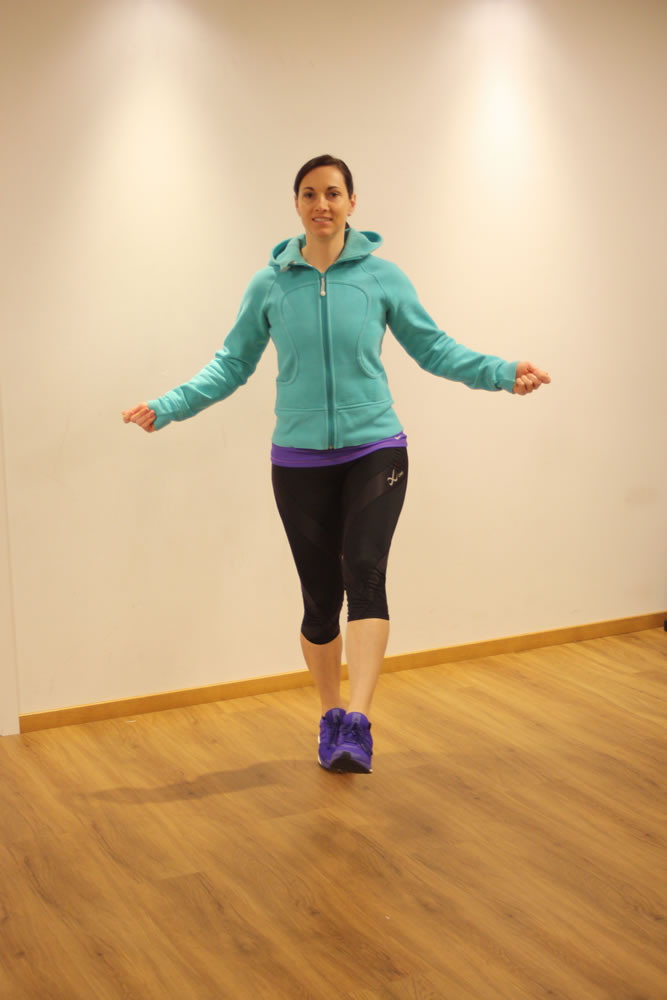 jump rope 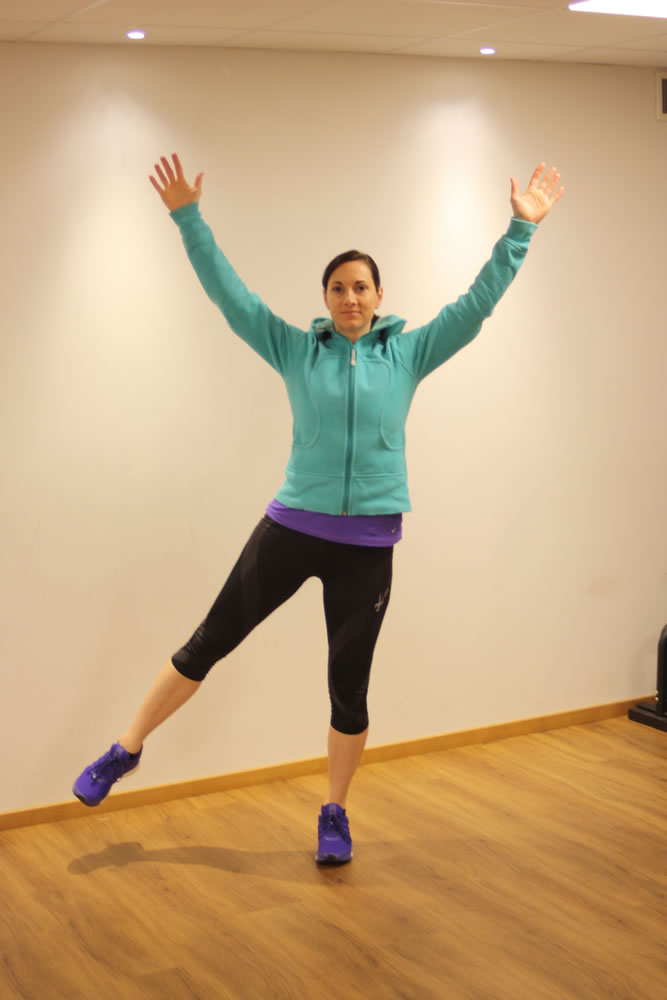 Star pose Burpee: start standing, put your hands on the floor, step or jump back with your feet to a plank position, do a push up, step your feet back to your hands, come back to standing, and then jump (if you want to). 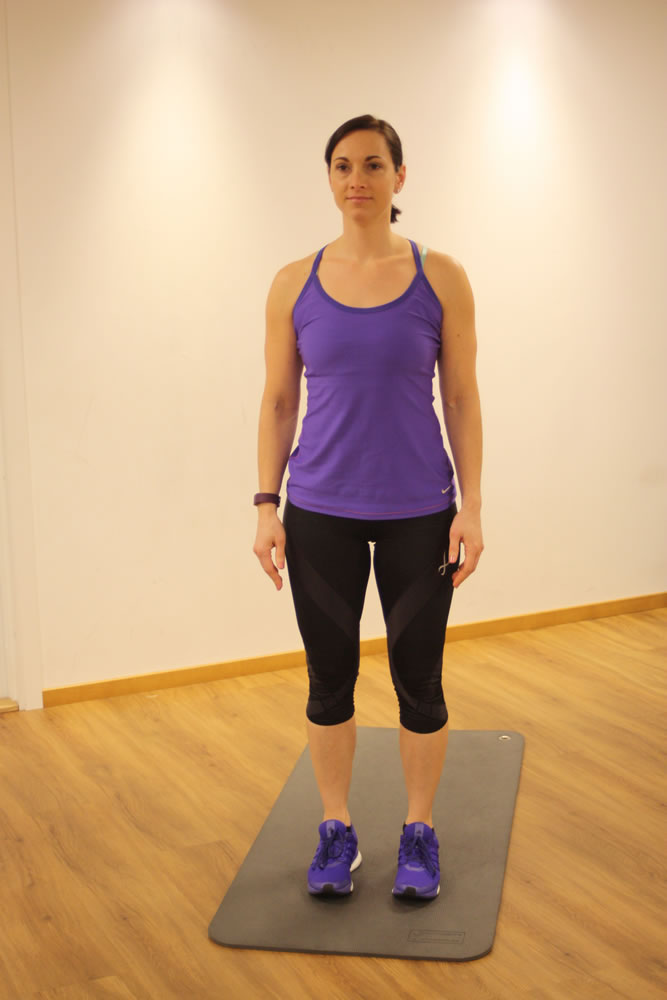 Begin standing 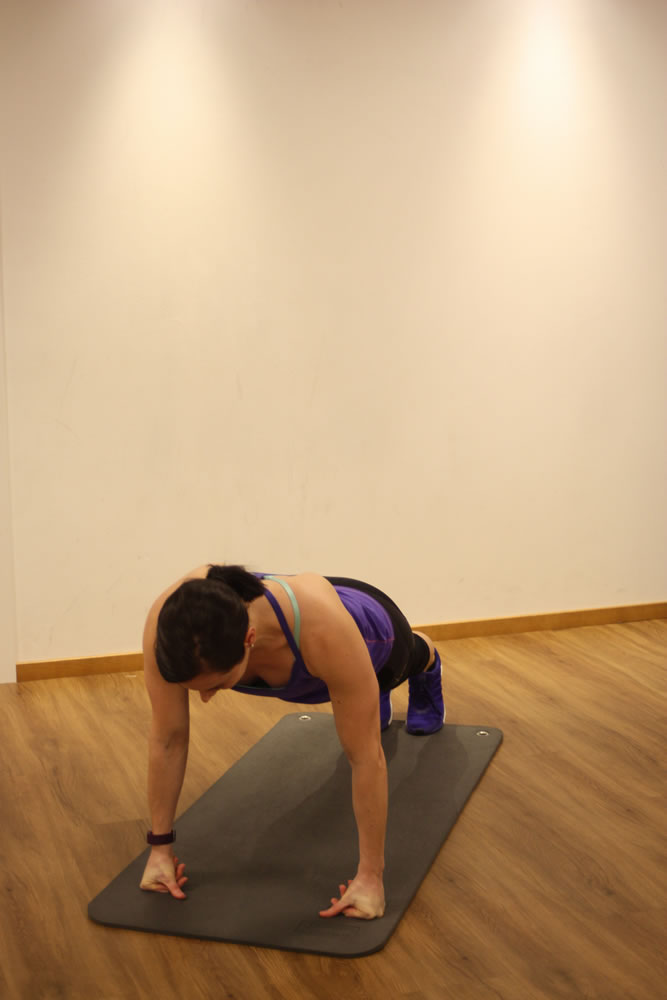 Come down into a plank position, push up 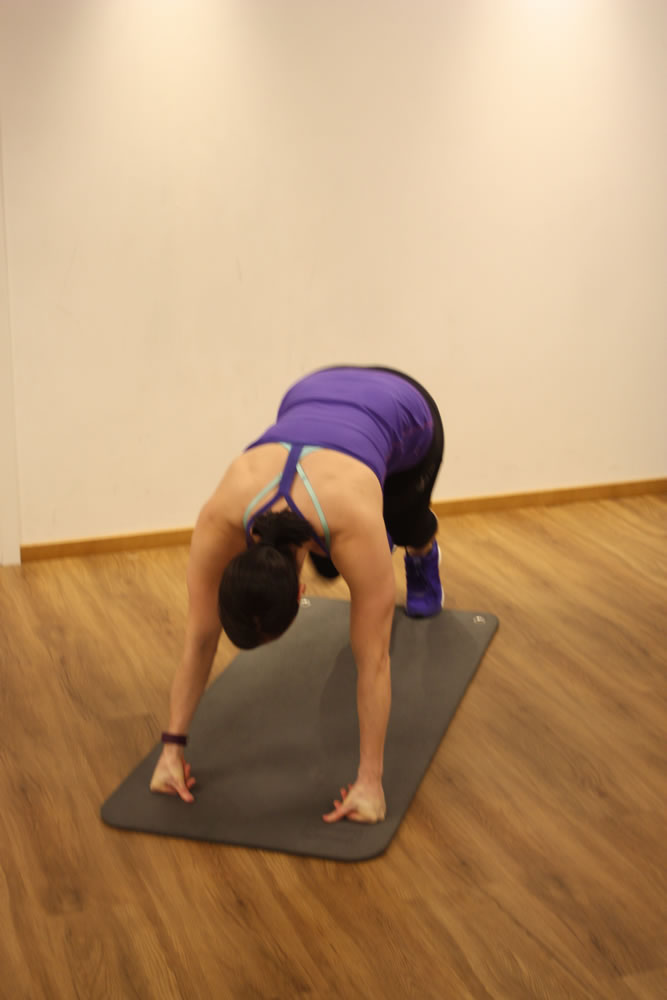 Come back to standing 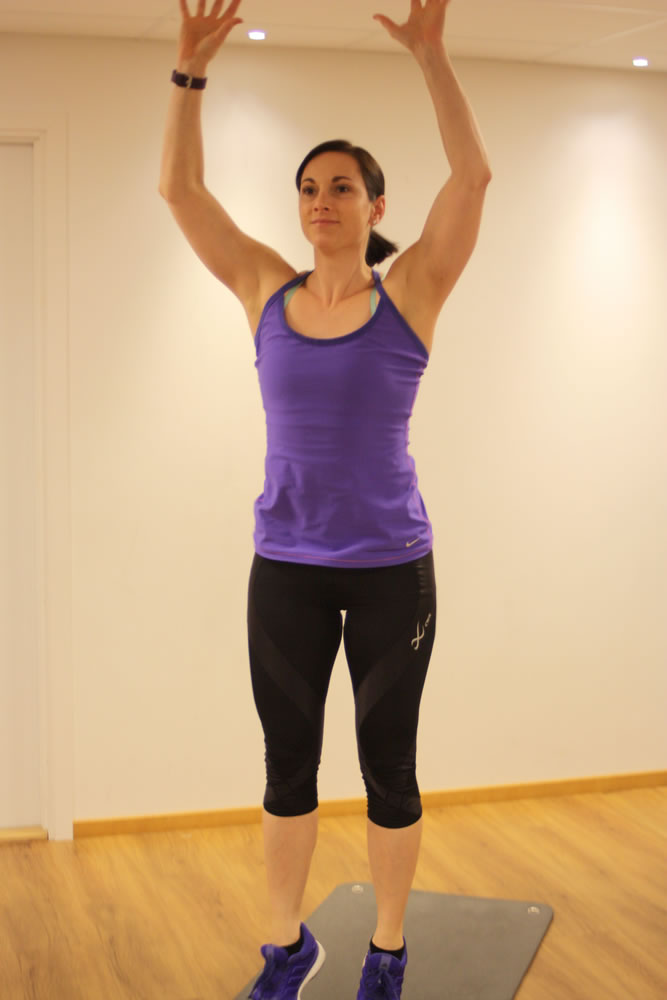 Jump Wall sit: come down into a sitting position with your legs in a 90° position. Keep your wieght on the middle to the back of your foot, not your toes. Bring it to the next level: raise one leg at a time for 5 to 10 seconds, or as long as you can hold. Keep most of your weight on the middle to back part of your feet, not your toes! 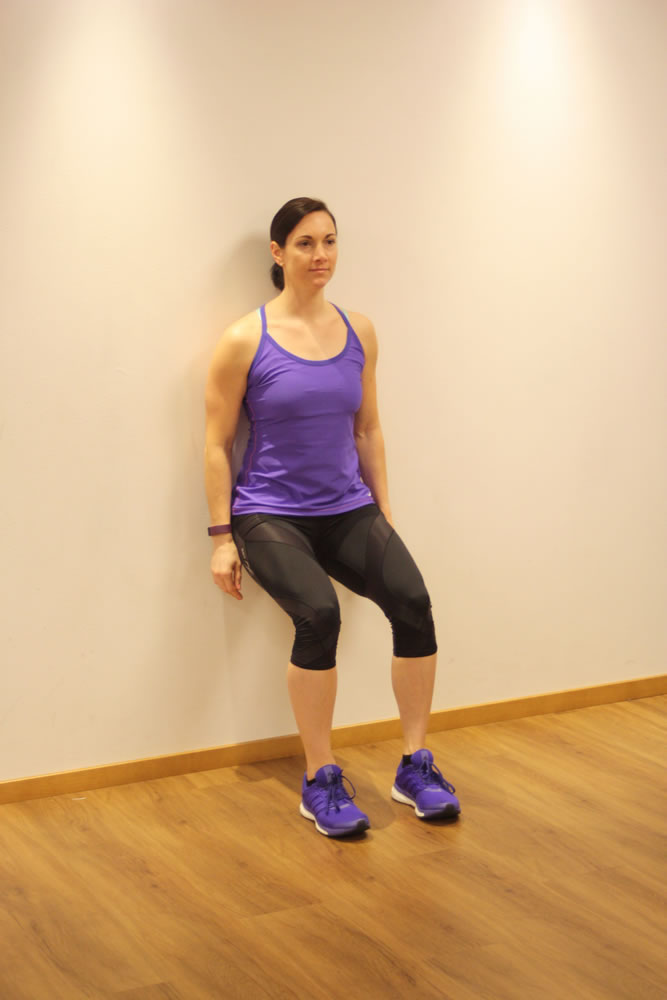 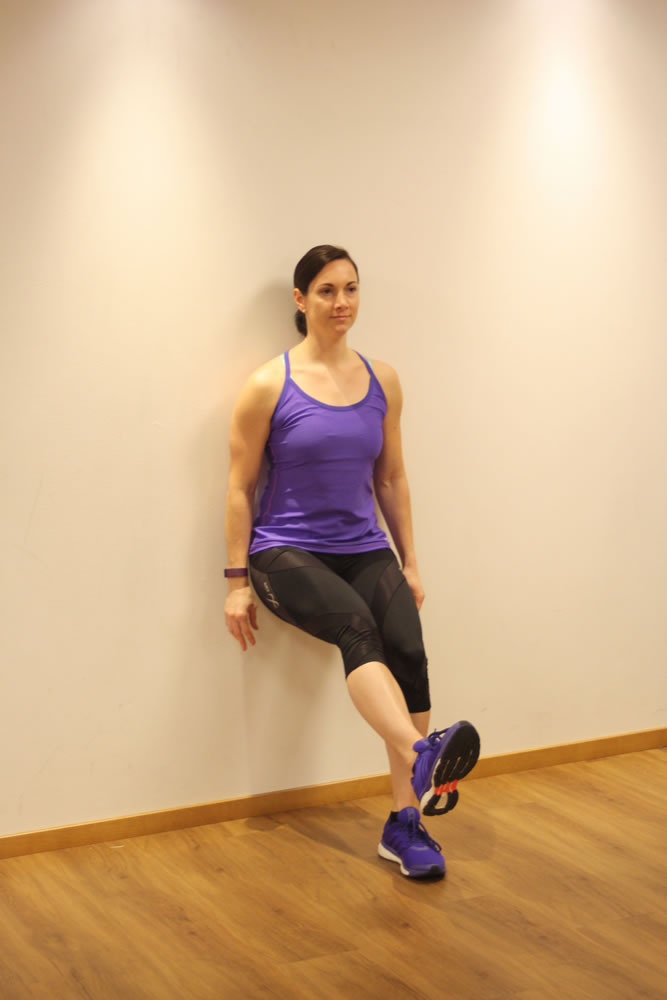 Push ups Choose either to begin on your knees or your toes. You can use your fists if the exercise is hard on your wrists. Remember to keep your core tight while you perform push ups. 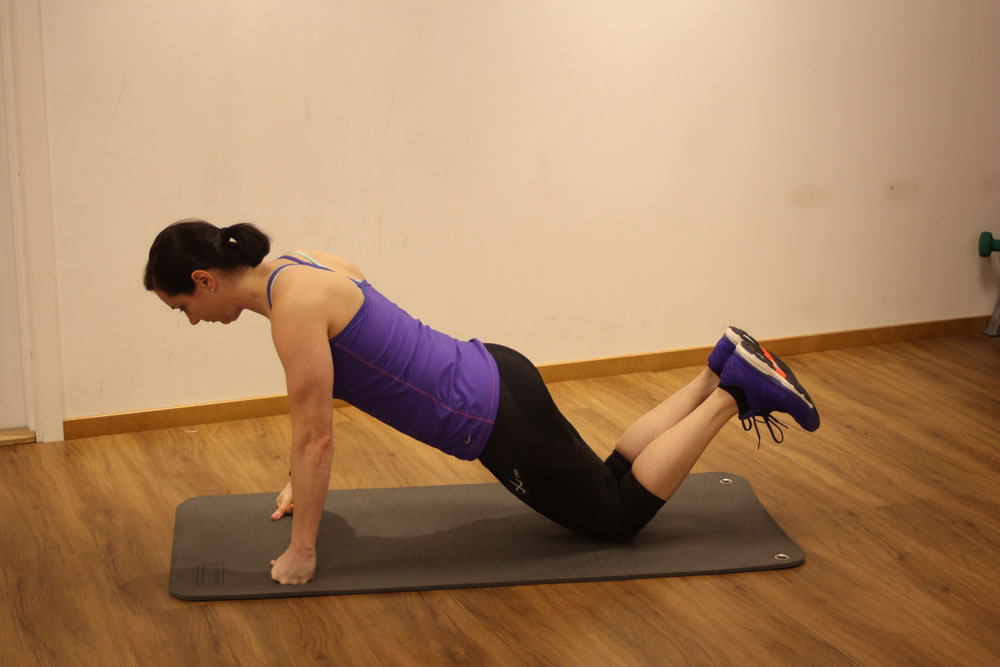 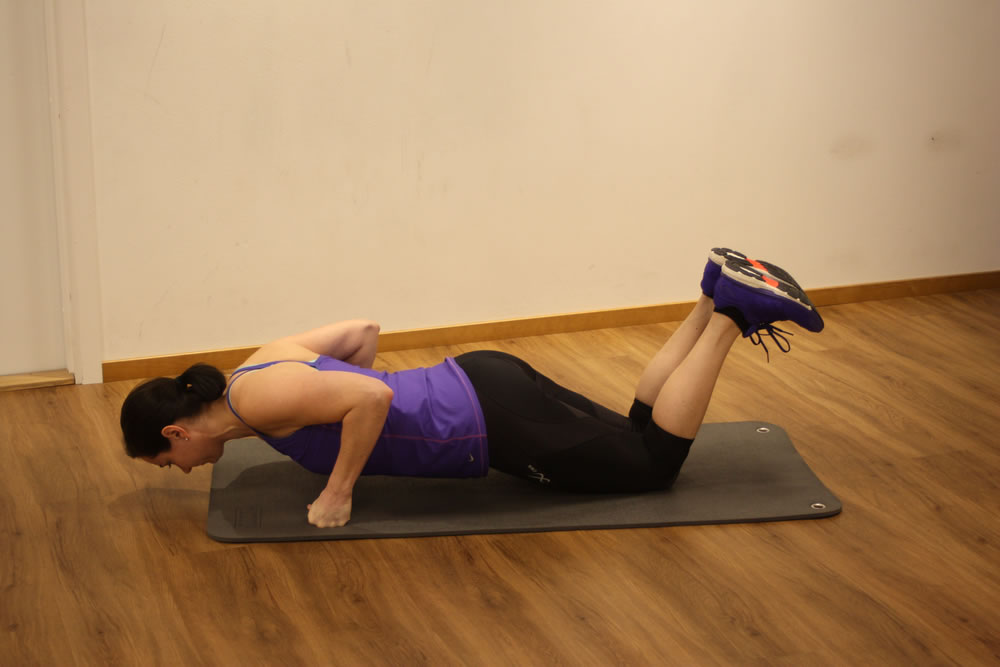 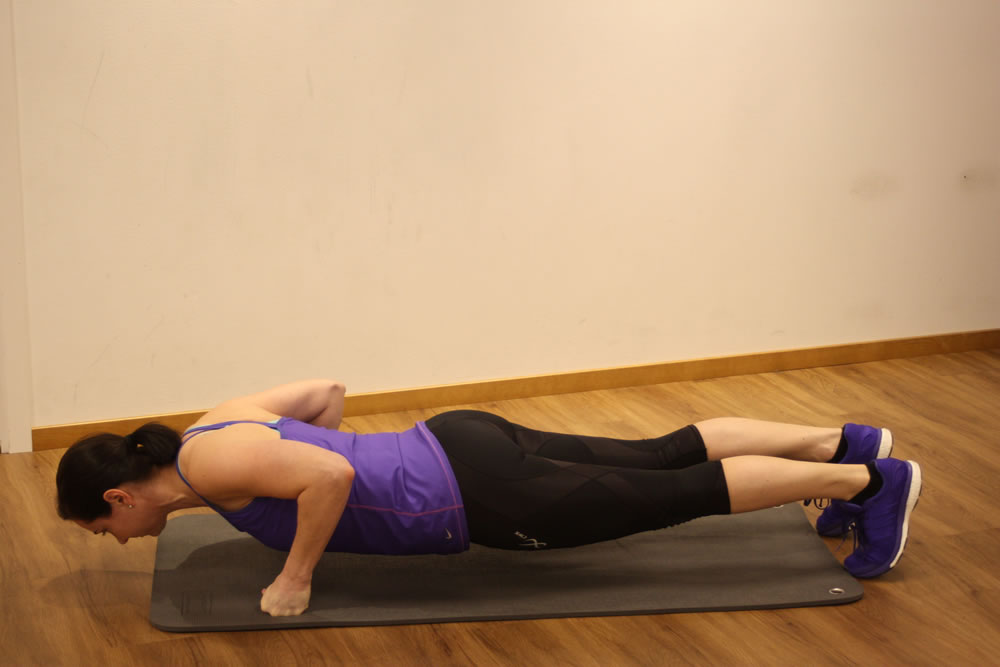 Lunges – 15 seconds each side Static lunges: start in a lunge position and bend both knees to come closer to the ground. Bring it to the next level by starting in a standing position and then stepping forward and then coming back to the standing position. *For both exercises keep most of your weight on the middle to back part of your feet, not your toes!* 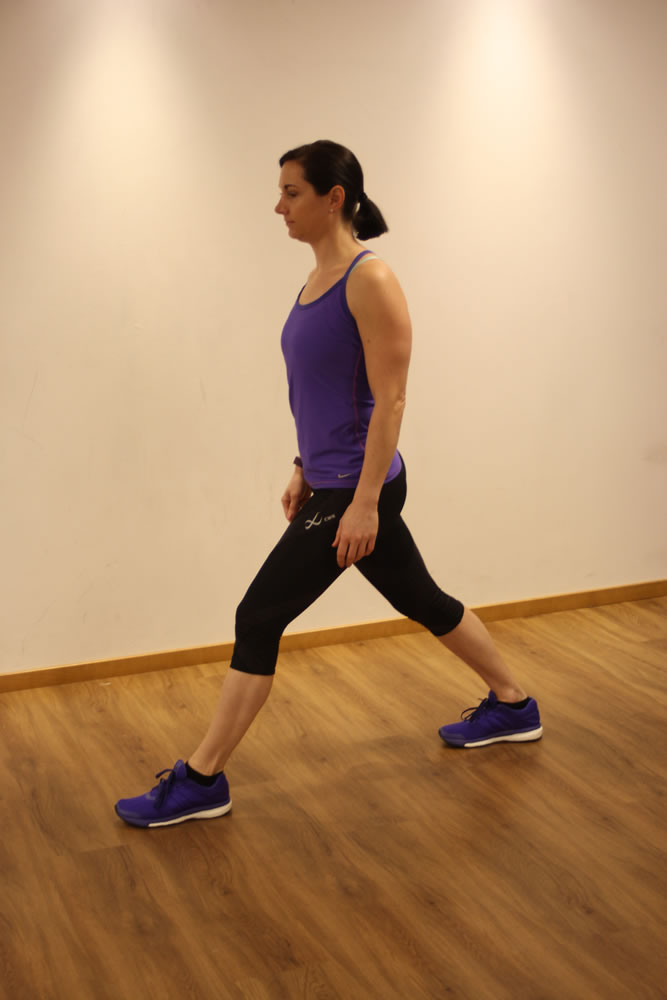 Static lunge 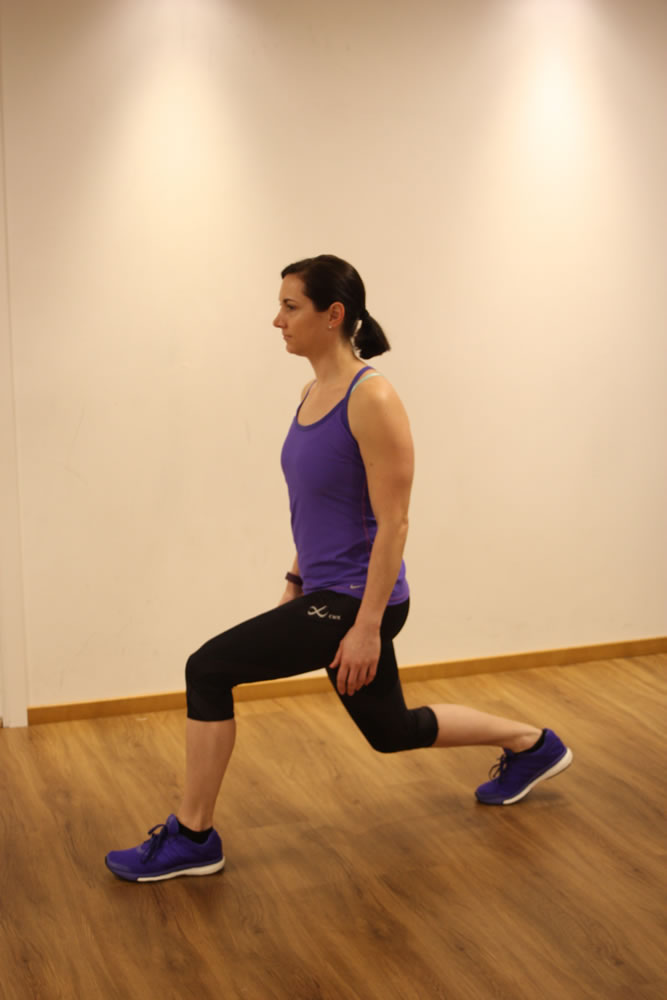 Moving lunge starting position Triceps Start in a reverse quadraped position, making sure that your hands are in a comfortable position behind your body. Try to keep your hands closer to your body as having them out farther will put strain on your shoulders. Then push the hips up by squeezing the bum. Dip down by bending the elbows straight back and then come back up and push the hips up by squeezing the bum. If your elbows bow out to the sides you’ll lose contact with the triceps muscle so try to keep you elbows bending straight back behind you and not bending out to the sides. 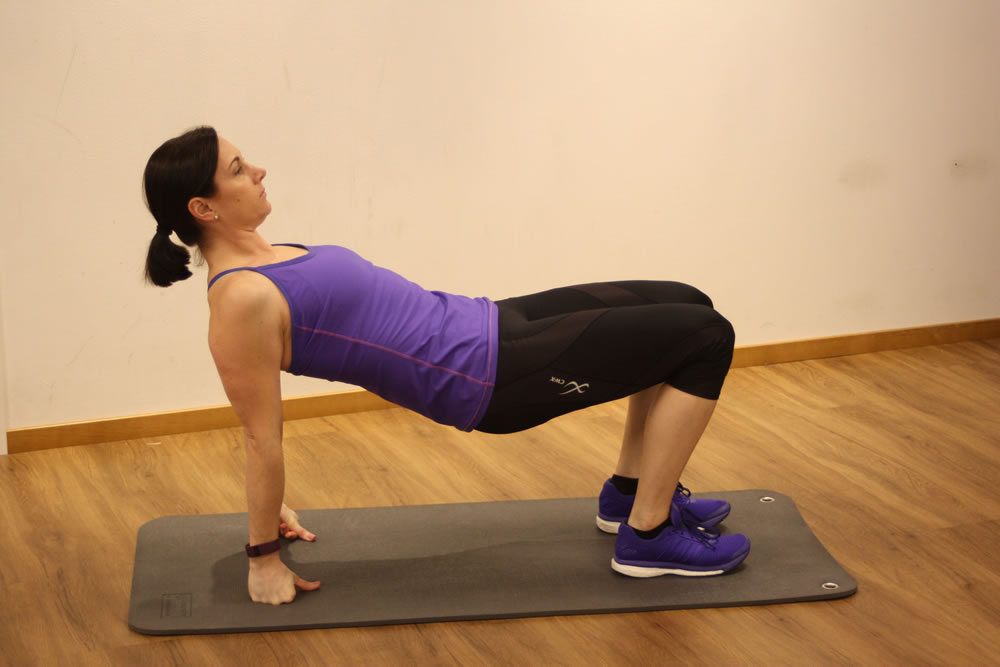 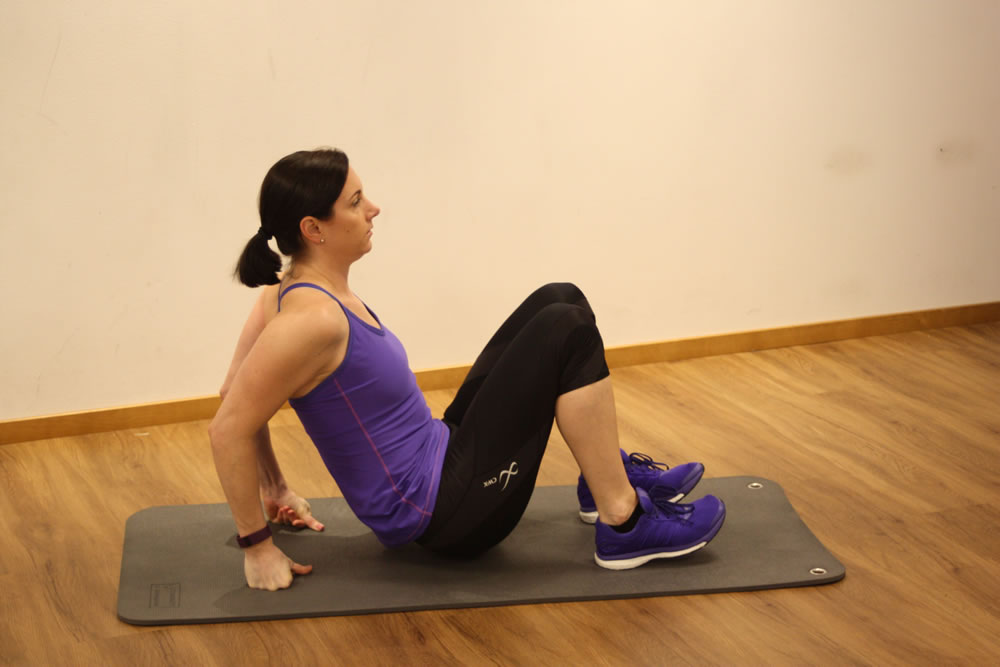 Hip press Lay on your back with your feet at a comfortable distance from your body. Squeeze the bum muscles and push up with your hips. There’s no need to push the hips up and over extend your back. Try to keep a neutral spine and only push up as high as is comfortable for your body. Be sure to push with your heels and squeeze your bum muscles as your come up.  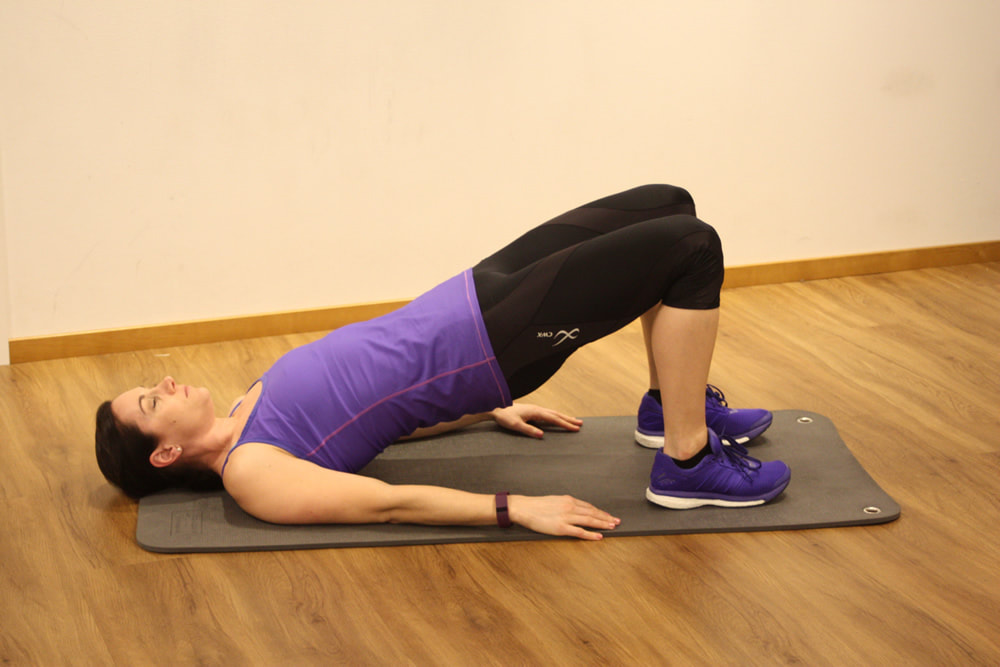 Shoulder push up You can use your fists if the exercise is hard on your wrists. Start in a downward facing dog position or the beginning of a handstand position. Bend your elbows and bring the top of your head down as close to the ground as possible. Push back up to the starting position. 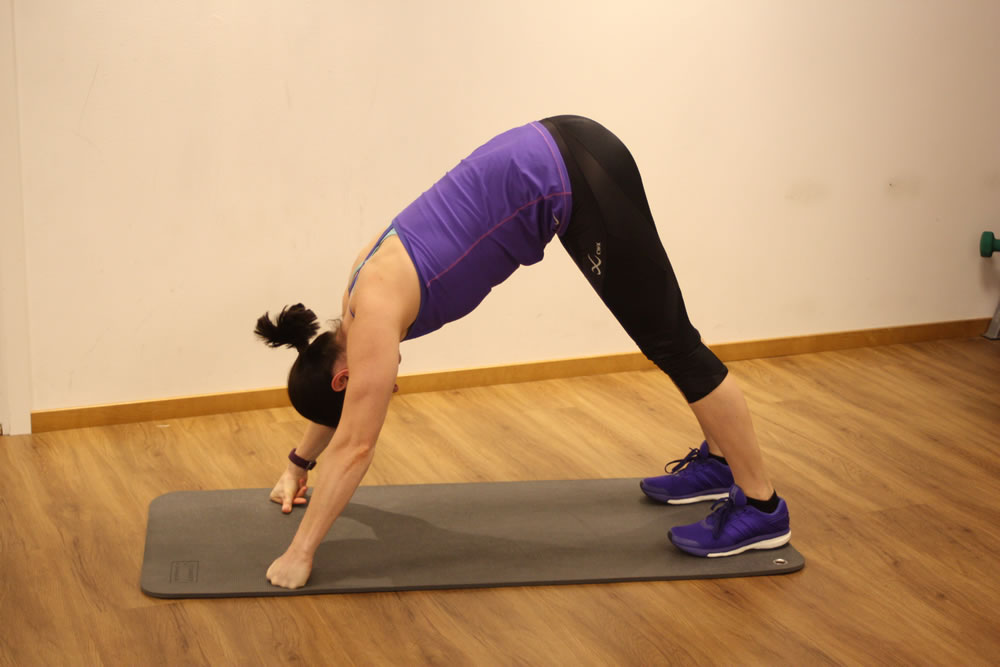 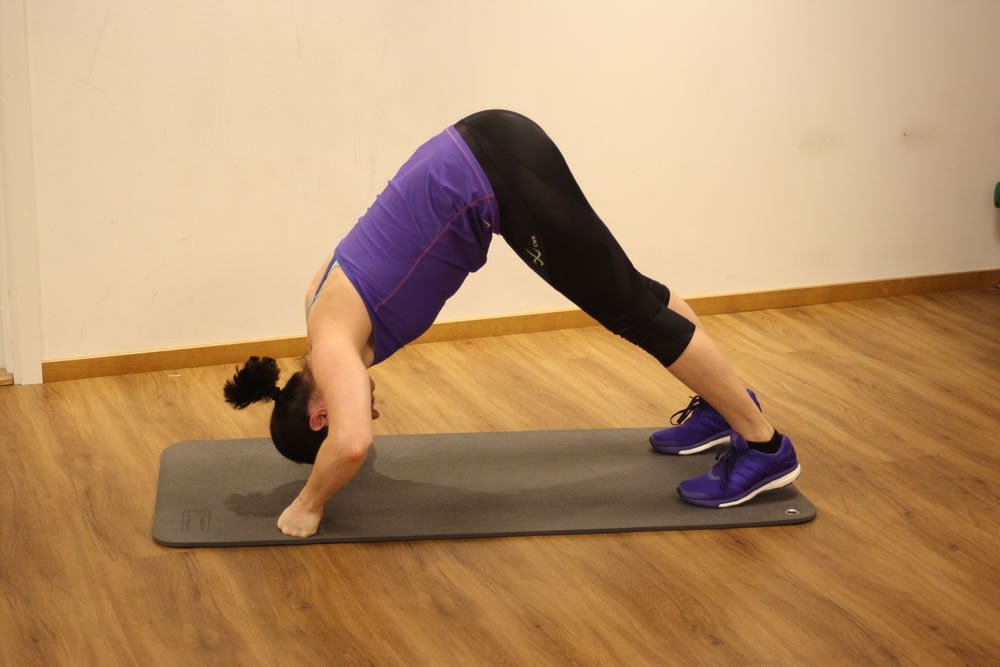 Calf raises – 10 seconds on each side Look at the toe positions below. Preform 10 seconds in each position. 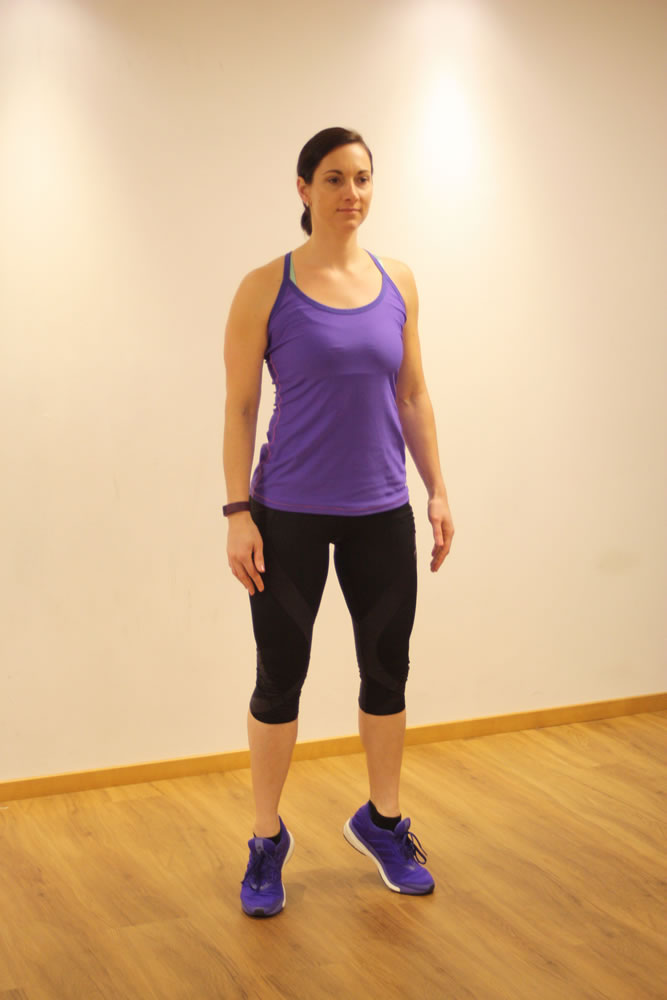 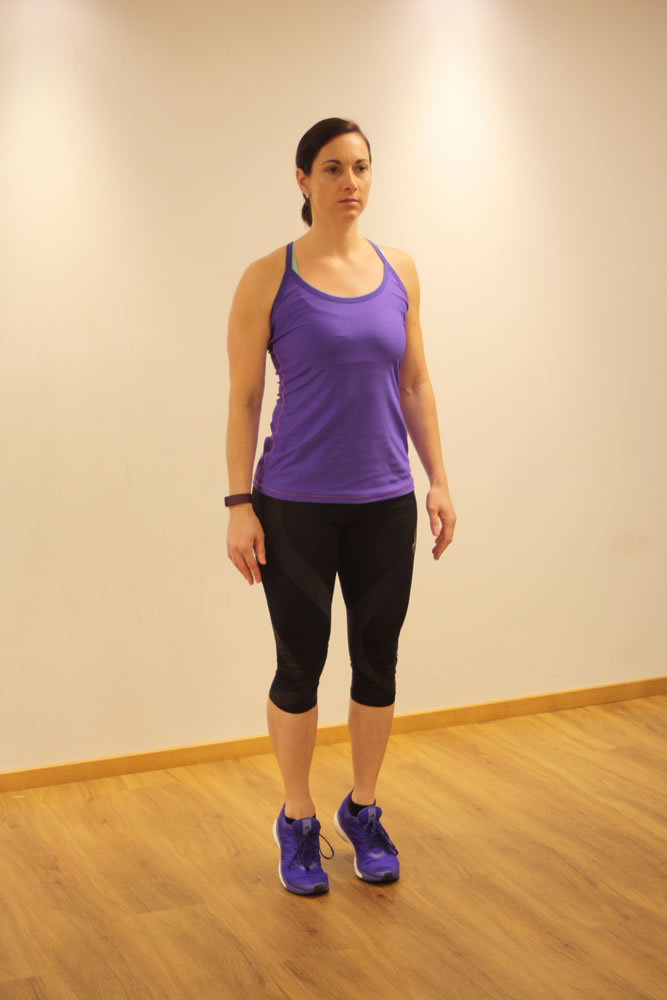 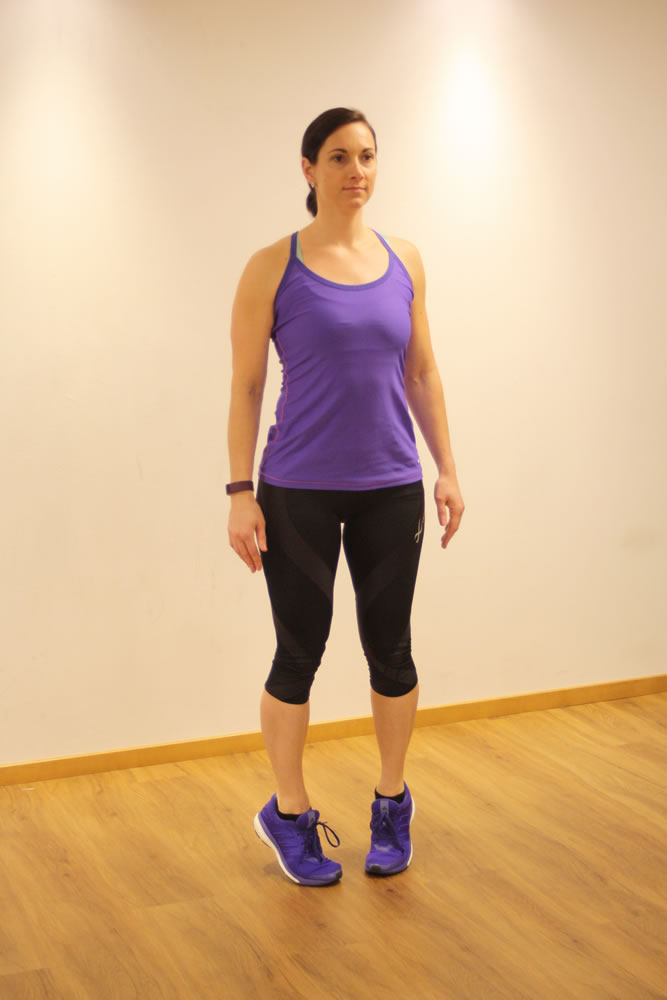 Core – 2 mins Crunch: Feet on the floor or legs at 90°. Bring your shoulders up, hold, and come back down. Repeat. Keep your chin in a neutral position and envision an apple under your chin and on your chest. 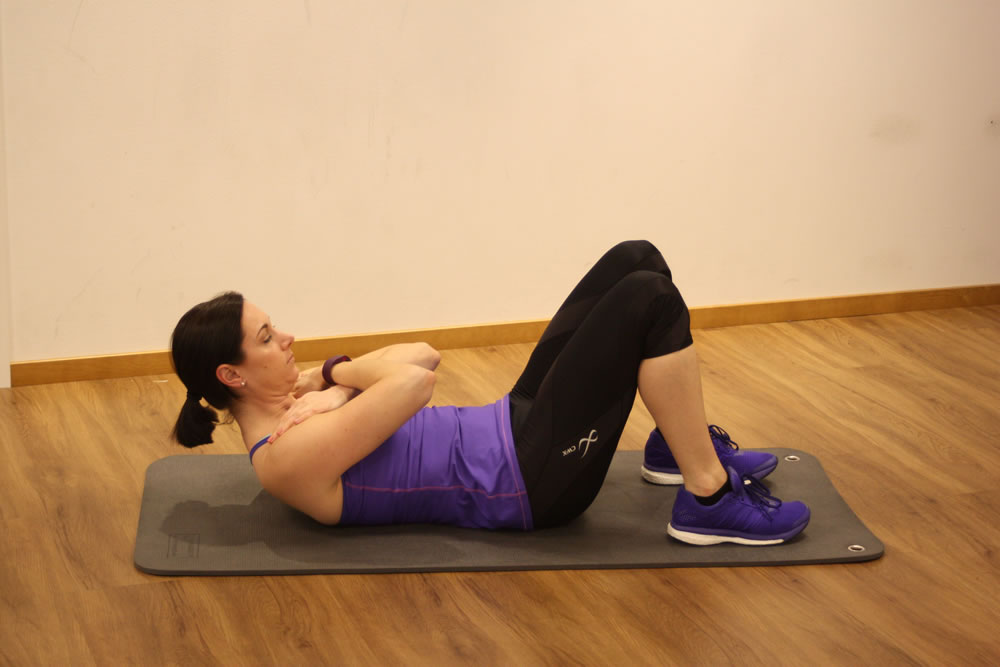 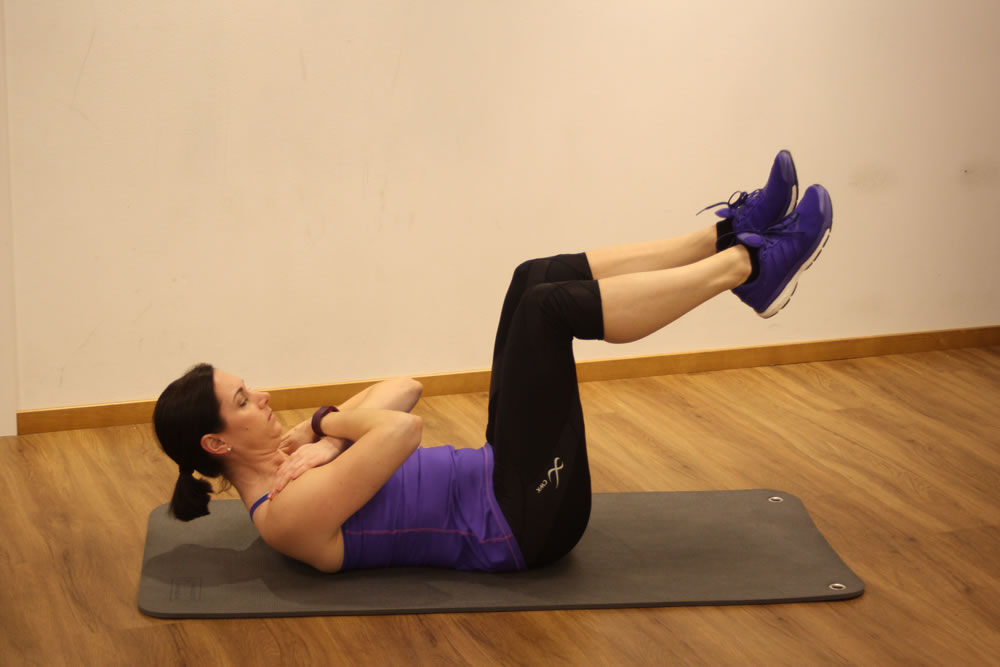 Side to sides: come up into a crunch position and then rotate side to side by touching your hands to your heels. 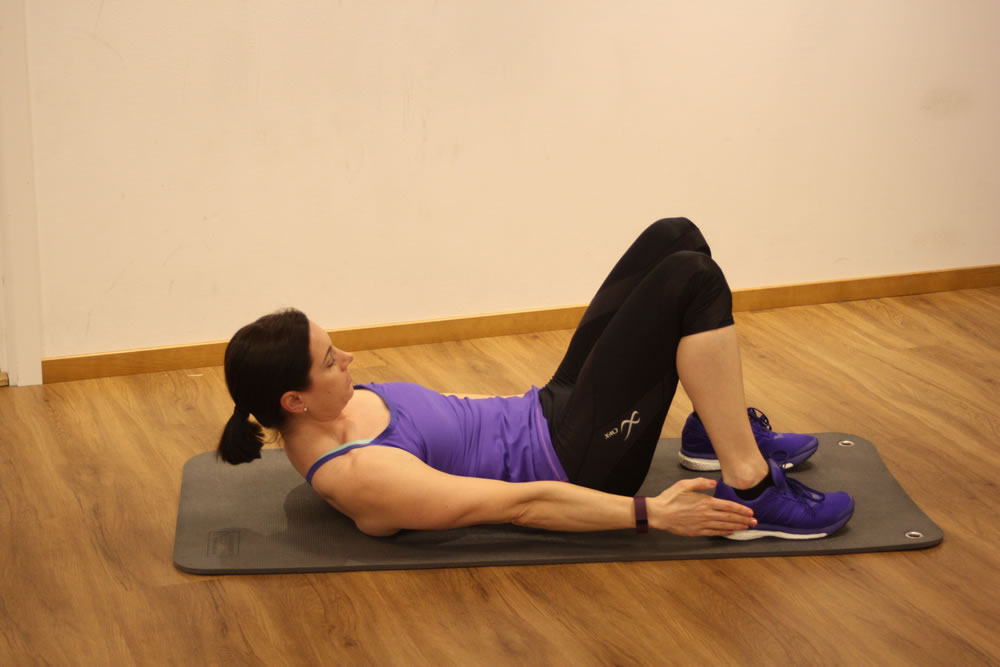 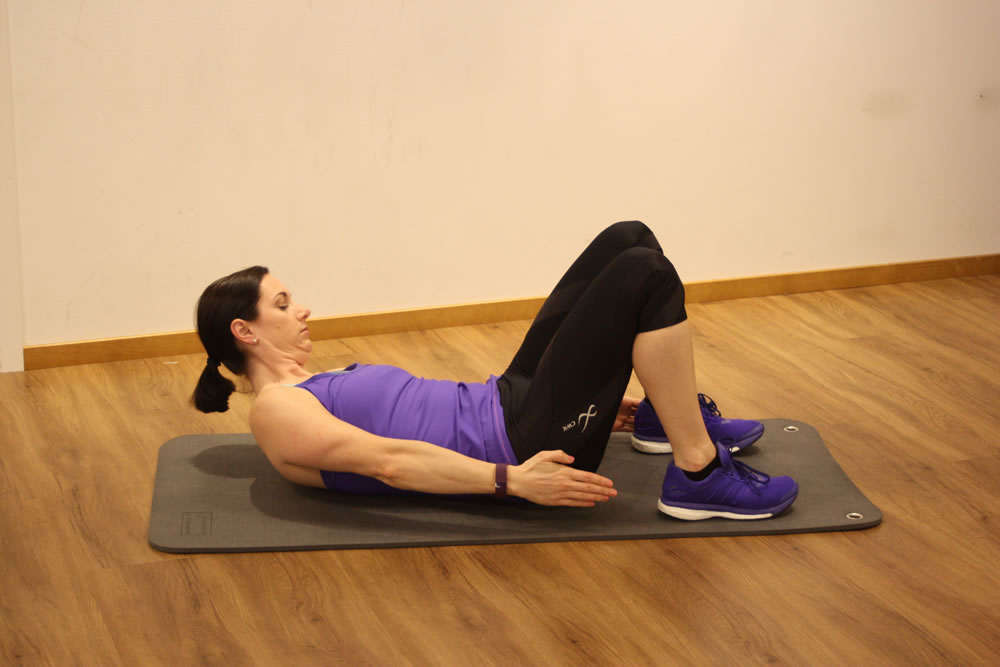 Bring it to the next level: repeat the workout by using the two minute warm up time as two minute cardio. Or finish your workout with stretching. Stretch Sit in a wide leg position, toes pointing up, keep your back straight and bend forward as far as it’s comfortable for you. 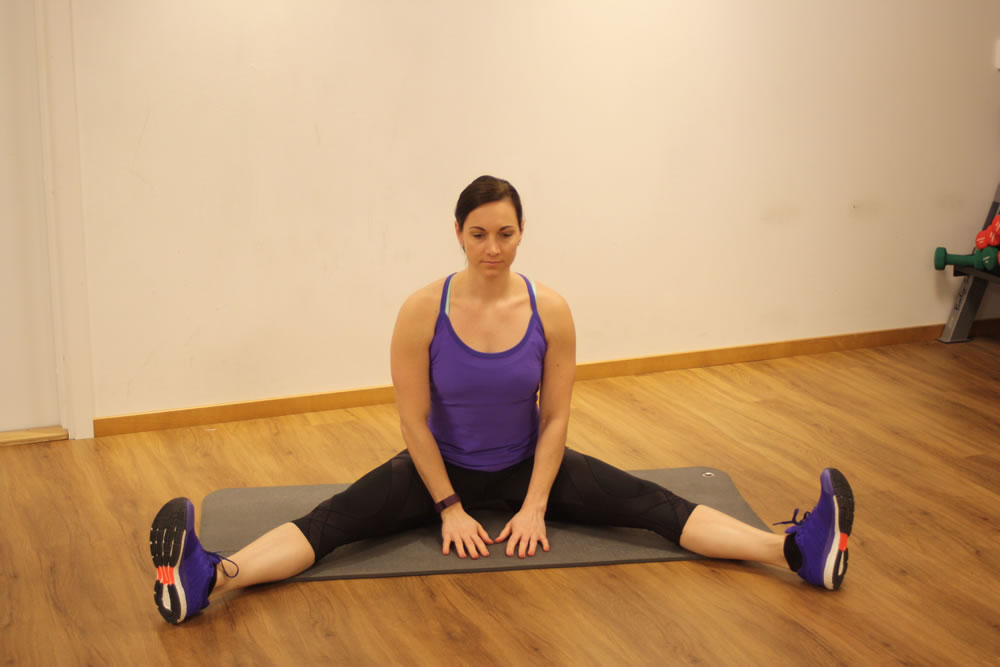 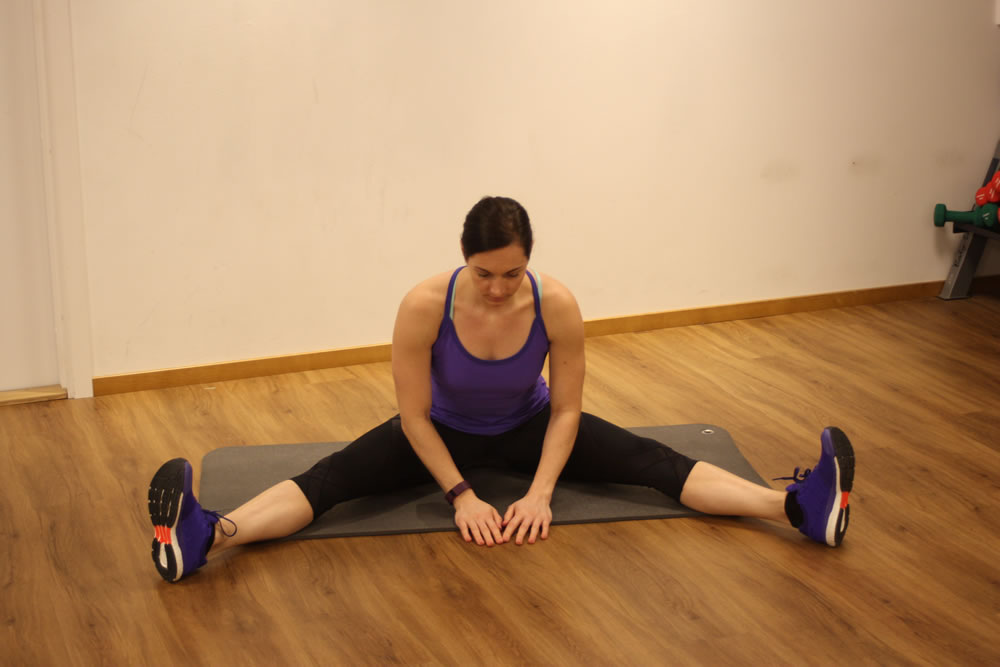 Next, come back up to a straight back and bend over to the side by first reaching your hand up in the air and then stretching over to the side. 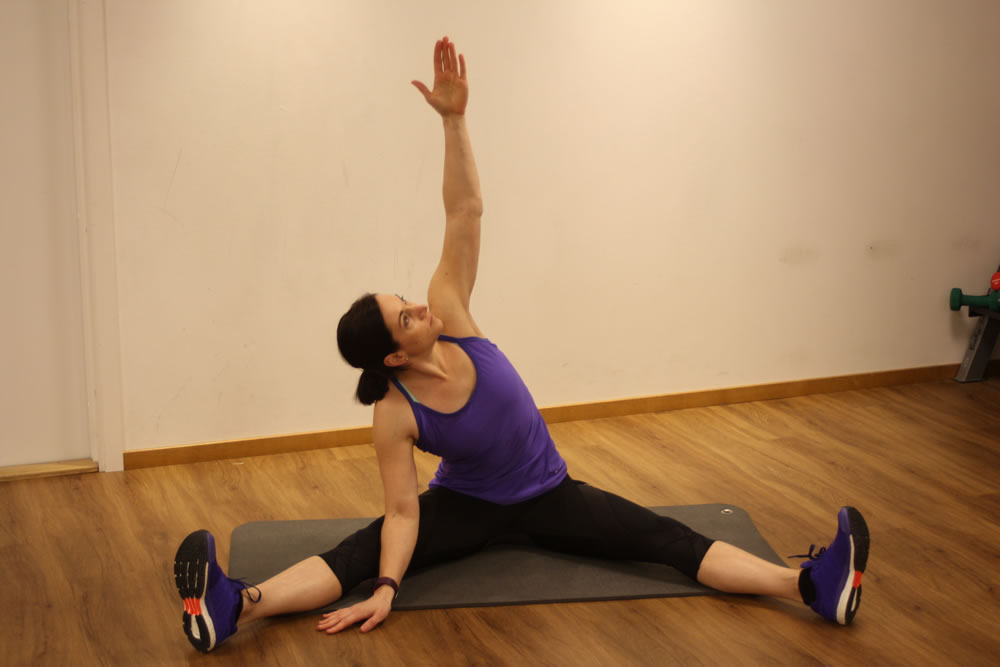 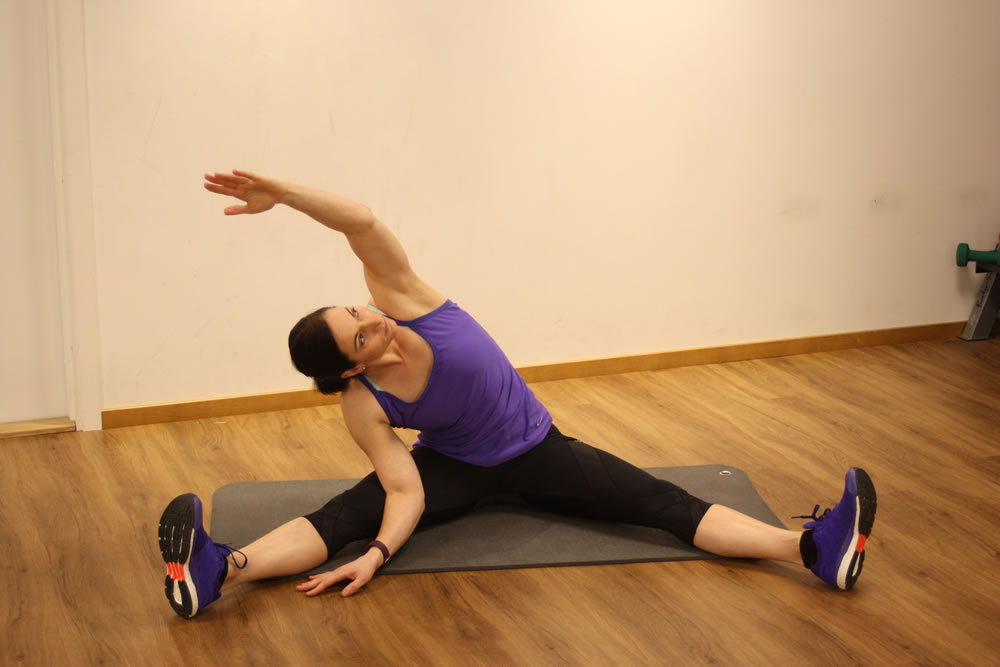 Next, cross one leg over the other and hug your kneed into your chest. Hold and repeat on the other side.
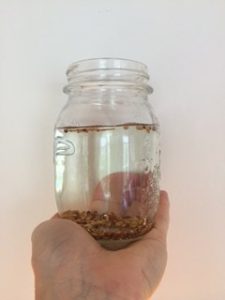
BY COURTNEY LANDIN POSTED: MARCH 27, 2017 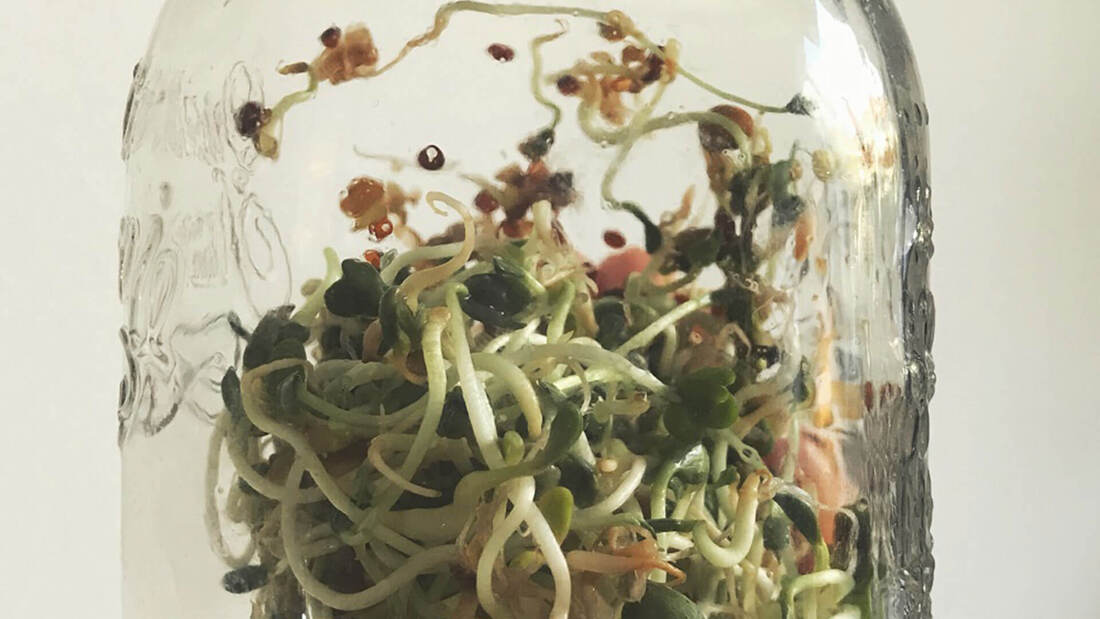 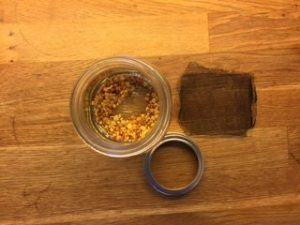 Grow your own sproutsSprouted foods are said to have 100 times more enzymes than uncooked fruits and vegetables. Enzymes help extract more vitamins, minerals, amino acids, and essential fatty acids from the foods you eat. Sprouts also have a higher quality protein and fiber content which helps the body improve immune function and get rid of toxins. Growing sprouts can sound complicated, but it really is an easy process and a simple way to add a healthy food to your meals. Here’s what you’ll need to get started.
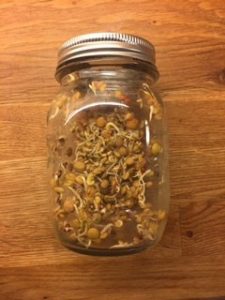
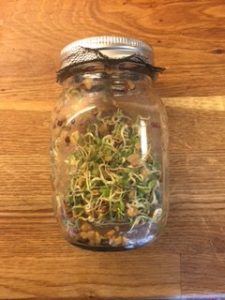
First, be sure to clean the jar. Next, add two tablespoons of seeds into the jar, fill with water, and use the mesh to cover the top. If you are using cheese cloth, use a rubber band to secure the top. With the canning jar, use only the ring portion of the lid. Now, let the seeds soak for 8 hours. After the seeds have soaked, drain the water from the jar. You’ll keep the mesh on, that’s what it’s there for! In less than 24 hours you’ll start to see the seeds sprouting! After you’ve drained the water on the first day, keep the jar out of sunlight and don’t let the seeds sit in any extra water. The jar can be kept upright or tilted upside down in a bowl. Just be sure the top is not covered to allow for air flow. Once a day, fill the jar with water to rinse and wet the seeds. Be sure the seeds aren’t left sitting in water though. In just a few days, you’ll have sprouts ready to eat. After the sprouts have grown after several days, put the jar into the fridge and eat when you please. They are a great topping for any meal! Happy sprouting! BY COURTNEY LANDIN POSTED: AUGUST 19, 2016
|